Automated lane following of a Waveshare JetRacer with artificial intelligence: Unterschied zwischen den Versionen
| Zeile 60: | Zeile 60: | ||
== Programmierung == | == Programmierung == | ||
For the implementation part, a Jupyter notebook has been used, and the code has been | |||
written in Python because it is very user-friendly and it enabled connecting the Windows | |||
PC directly over wifi with the Jetracer.. There is already a library file for the jetracer that | |||
has been developed, and it includes all of the essential functions for the jetracer. | |||
First, using the Etcher program, a prebuilt image that was based on the jetpack 4.5 file | |||
was written to an SD card. This file was retrieved from the official waveshare website. | |||
Next, the jetpack 4.5 file was installed. The NVIDIA JetPack software development kit is | |||
the most comprehensive instrument for the creation of artificial intelligence applications. | |||
All Jetson modules and developer kits may be used with the help of the JetPack software | |||
development kit. Included in the JetPack software development kit are the most recent | |||
Linux Driver Package with the Linux operating system, as well as CUDA-X accelerated | |||
libraries and APIs for Deep Learning, Computer Vision, Accelerated Computing, and | |||
Multimedia. In addition, the software development kit also includes the Linux kernel. | |||
After completing the writing process, the micro SD card was placed into the Jetson nano, | |||
and the device is now prepared to connect to a wifi network using the Jupyter notebook. | |||
The IP address was obtained via the use of the USB connection, and the system may | |||
now be accessed from the personal computer. After successfully logging into the system, | |||
the code that was created in the Jupyter notebooks will be accessible and may also be | |||
changed. So then some Python packages should be installed, and the power mode should | |||
be configured. which can be found in detail on their website . | |||
First, it was tested using a controller that allows the user to operate the jetracer manually. | |||
This controller is included with the jetracer. Inside may be found a file for a rudimentary | |||
motion and teleportation notebook, which can be used to allow the controller to drive the | |||
jetracer. It is recommended that the controller be linked to the personal computer by way | |||
of the jupyter notebook, which then transmits the signal to the jetracer. The controller | |||
may be callibrated with the use of a library known as ipywidgets. Everything about the | |||
vehicle, including the throttle gain, steering offset, and axes, may be altered using the | |||
Jupyter notebook. | |||
== Komponententest == | == Komponententest == | ||
Version vom 5. Januar 2023, 08:41 Uhr
Autor: Tasawar Siddiquy
Art: Bachelorarbeit
Dauer: 14.09.2022 -
Betreuer: Prof. Schneider
Aufgabenstellung
- Mechanischer und elektrischer Aufbau eines JetRacers
- Literaturrecherche zu den verfügbaren Programmierumgebungen
- Vergleich und Auswahl einer passenden Programmierumgebung
- Einarbeitung in die Programmierumgebung
- Anlernen des Deep Learning Netzwerkes zur Spurführung
- Modul und Systemtests mit dem JetRacer auf der Fahrbahn
- Ergebnisdarstellung und Ausblick
- Dokumentation des Umgang mit dem JetRacer im HSHL Wiki
- Bereitstellung von Demoprogrammen zum einfachen Einstieg
- Dokumentation nach wissenschaftlichem Stand
Anforderungen an die wissenschaftliche Arbeit
- Wissenschaftliche Vorgehensweise (Projektplan, etc.), nützlicher Artikel: Gantt Diagramm erstellen
- Wöchentlicher Fortschrittsberichte (informativ)
- Projektvorstellung im Wiki
- Studentische Arbeiten bei Prof. Schneider
- Anforderungen an eine wissenschaftlich Arbeit
Getting Started
Nutzen Sie diese Artikel, um sich in das Thema einzuarbeiten:
- Wiki-Artikel_schreiben, die Vorlage finden Sie hier: Artikelvorlage
- Regeln zum Umgang mit SVN
- HSHL-Wiki: JetRacer
Nützliche Artikel
- Anleitung zum einfachen Einstieg in ROS2
- Doku des Projektstands WS2021/22
- Sicherer Betrieb eines AMR
- Navigation eines AMR mit ROS2

Projektplan
Anforderungen
Hardwareanforderungen
Softwareanforderungen
Funktionaler Systementwurf / Technischer Systementwurf
Komponentenspezifikation
-
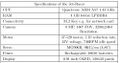
Specifications of the Jet-Racer

Specifications of the Jet-Racer
Programmierung
For the implementation part, a Jupyter notebook has been used, and the code has been written in Python because it is very user-friendly and it enabled connecting the Windows PC directly over wifi with the Jetracer.. There is already a library file for the jetracer that has been developed, and it includes all of the essential functions for the jetracer. First, using the Etcher program, a prebuilt image that was based on the jetpack 4.5 file was written to an SD card. This file was retrieved from the official waveshare website. Next, the jetpack 4.5 file was installed. The NVIDIA JetPack software development kit is the most comprehensive instrument for the creation of artificial intelligence applications. All Jetson modules and developer kits may be used with the help of the JetPack software development kit. Included in the JetPack software development kit are the most recent Linux Driver Package with the Linux operating system, as well as CUDA-X accelerated libraries and APIs for Deep Learning, Computer Vision, Accelerated Computing, and Multimedia. In addition, the software development kit also includes the Linux kernel. After completing the writing process, the micro SD card was placed into the Jetson nano, and the device is now prepared to connect to a wifi network using the Jupyter notebook. The IP address was obtained via the use of the USB connection, and the system may now be accessed from the personal computer. After successfully logging into the system, the code that was created in the Jupyter notebooks will be accessible and may also be changed. So then some Python packages should be installed, and the power mode should be configured. which can be found in detail on their website . First, it was tested using a controller that allows the user to operate the jetracer manually. This controller is included with the jetracer. Inside may be found a file for a rudimentary motion and teleportation notebook, which can be used to allow the controller to drive the jetracer. It is recommended that the controller be linked to the personal computer by way of the jupyter notebook, which then transmits the signal to the jetracer. The controller may be callibrated with the use of a library known as ipywidgets. Everything about the vehicle, including the throttle gain, steering offset, and axes, may be altered using the Jupyter notebook.
Komponententest
Ergebnis
Zusammenfassung
Lessons Learned
Projektunterlagen
YouTube Video
Das Video von diesem Projekt finden Sie auf Youtube unter dem Link:
Weblinks
Literatur
→ zurück zum Hauptartikel: Studentische Arbeiten