RPLidar with ROS2 and RVIZ: Unterschied zwischen den Versionen
Zur Navigation springen
Zur Suche springen
Keine Bearbeitungszusammenfassung |
Keine Bearbeitungszusammenfassung |
||
| (29 dazwischenliegende Versionen desselben Benutzers werden nicht angezeigt) | |||
| Zeile 1: | Zeile 1: | ||
This tutotrial shows how to connect a RPLidar to ROS2 and show in RVIZ | <big>This tutotrial shows how to connect a RPLidar to ROS2 and show in RVIZ. | ||
</big><br> | |||
<br> | |||
Connect RPLidar to the USB port and follw the steps to shown below<br> | |||
Note: Here we are using RPLidar A1 | |||
open your terminal and clone the github project to your colcon workspace src folder | |||
git clone https://github.com/CreedyNZ/rplidar_ros2.git | |||
Then source the bash | |||
source install/setup.bash | |||
After that, | |||
colcon build --symlink-install | |||
Then run rplidar ros package | |||
source ./install/setup.bash | |||
ros2 run rplidar_ros rplidarNode | |||
open a new terminal | |||
source ./install/setup.bash | |||
ros2 run tf2_ros static_transform_publisher 0 0 0 0 0 0 world laser_frame | |||
Then, open a new terminal | |||
source ./install/setup.bash | |||
rviz2 ./install/rplidar_ros/share/rplidar_ros/rviz/rplidar.rviz | |||
<br> | |||
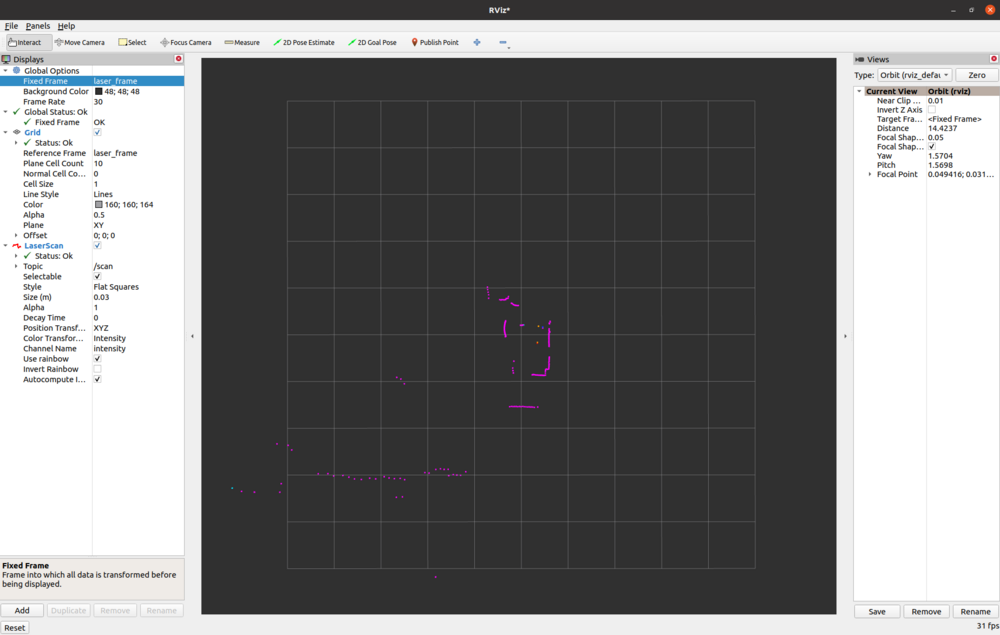
Then set frame into laser_frame | |||
After that, add laser scan and and select scan under Topic.<br> | |||
<br> | |||
[[Datei:RViz Screen.png|thumb|links|mini|1000px|RViz Screen]] | |||
<br clear=all> | |||
<br> | |||
Hurray now you can see the lidar scan in the RVIZ | |||
<br> | |||
To see the lidar scan result in the console, Follw the steps bellow | |||
source ./install/setup.bash | |||
ros2 run rplidar_ros rplidarNodeClient | |||
Now you should see the Lidar scan result in the console | |||
Aktuelle Version vom 27. Oktober 2022, 12:36 Uhr
This tutotrial shows how to connect a RPLidar to ROS2 and show in RVIZ.
Connect RPLidar to the USB port and follw the steps to shown below
Note: Here we are using RPLidar A1
open your terminal and clone the github project to your colcon workspace src folder
git clone https://github.com/CreedyNZ/rplidar_ros2.git
Then source the bash
source install/setup.bash
After that,
colcon build --symlink-install
Then run rplidar ros package
source ./install/setup.bash
ros2 run rplidar_ros rplidarNode
open a new terminal
source ./install/setup.bash
ros2 run tf2_ros static_transform_publisher 0 0 0 0 0 0 world laser_frame
Then, open a new terminal
source ./install/setup.bash
rviz2 ./install/rplidar_ros/share/rplidar_ros/rviz/rplidar.rviz
Then set frame into laser_frame
After that, add laser scan and and select scan under Topic.

Hurray now you can see the lidar scan in the RVIZ
To see the lidar scan result in the console, Follw the steps bellow
source ./install/setup.bash
ros2 run rplidar_ros rplidarNodeClient
Now you should see the Lidar scan result in the console