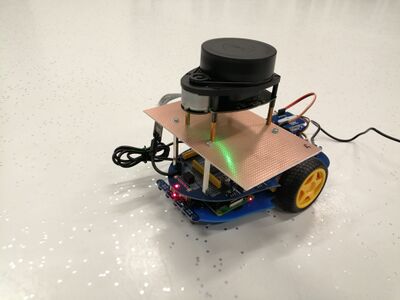
Robot Hardware Components and Programming
The AplphBot is modified with a RPLidar is used for this project. Raspberry pi 4 is used as a computer with Odometer sensor and motor driver L298P is used.

Raspberry Pi 4 is installed with Linux server and established a SSH connection with the robot and PC.
Please go through the documentation here for the steps: How to install Ubuntu Server on your Raspberry Pi
Then ROS2 is installed in raspberry pi through SSH
RPLidar Integration
Now that we have the driver software, we can post a LaserScan topic and communicate with the laser. Actually, there are a few distinct versions of the driver available. We are utilizing the package repository version in this instance. To install the package,
> sudo apt install ros-foxy-rplidar-ros <
Therefore, we must run the driver next. Currently, for the version that is installed on the apt repo, the package name is rplidar ros, and the node name is rplidar_composition. Several further optional settings must also be set.
- -p serial_port:=/dev/ttyUSB0 - The serial port the lidar
- -p frame_id:=lidar_link - The transform frame of the lidar
- -p angle_compensate:=true - Simply turn this setting on, please. If you don't turn it on, even though it appears to be on, it won't function properly.
- -p scan_mode:=Standard - What scan mode the lidar is in, how many points there are, and other things are controlled
Then the final commond is
> ros2 run rplidar_ros rplidar_composition --ros-args -p serial_port:=/dev/ttyUSB0 -p frame_id:=lidar_link -p angle_compensate:=true -p scan_mode:=Standard
<
Now, LaserScan messages ought to be being published by the driver node. We can once again utilize RViz to verify this. We'll need to manually define the fixed frame by typing in laser_frame if robot_state_publisher isn't functioning.
Setting up Motor Driver and Programming
One of the crucial components of the intelligent robot is the motor driver module. The motor driver chip used by AlphaBot is the ST L298P driver chip, which has a high voltage and large current.
Interface definition of driver module:
The left motor is connected to IN1 and IN2, and the right motor is connected to IN3 and IN4. The output enable pins ENA and ENB are active high enabled. The PWM pulse will be outputted from IN1, IN2, IN3,
and IN4 to regulate the speed of the motor robot when they are driven to High level.
Control theory:
 IN1  IN2  IN3  IN4    Descriptions

  1     0   0     1    The robot moves straight when the motors revolve forward.
  0     1   1     0    The robot retracts when the motors rotate rearward.
  1     0   0     0    The robot moves to the left when the left motor stops and the right motor rotates.
  0     0   0     0    The robot halts when the motors sops.
Then a topic motortest is created for making the movement of the robot by creating a publishing node. The key word forward, backward, left, right, stop is used for the movement of the robot by publishing it into the topic.
For runing the motortest topic following command is used,
ros2 launch motortest motortest_launch_file.launch.py
To move the robot forward, following command is used,
ros2 topic pub /cmd_vel std_msgs/msg/String "data: forward"
Setting up Odometry Sensor and Programming
A lm393/F249 photoelectric sensor and a coded disc are both parts of the speed testing module. Both an infrared transmitter and a receiver are present in the lm393/F249 photoelectric sensor. The sensor will produce a high level voltage if the infrared receiver is blocked from seeing infrared light. The high level voltage transforms into a low level voltage after passing the inverting schmitt trigger. The relative indication turns on at this stage. DOUT will generate a succession of high level pulses and low level pulses when the coded disc is running. You can determine the speed of the intelligent robot by counting how many pluses are added during one cycle. We employ the Schmitt trigger in this situation because it produces a reliable output signal with a clean, jitter-free waveform.
Then a package called ros2_f249_driver is created for calculating the RPM of the wheels. This package communicates with the GPIOs on the Raspberry Pi to accumulate the ticks produced by an lm393 (F249) sensor and determine the RPM. The sensor is unable to determine the direction of rotation on its own. In any scenario, it will add up the total number of ticks for both rotation directions and then determine the RPM using that information.
Make sure the f249driver.h configuration parameters are set in accordance with your setup. Those that can be customized are:
- Sensor attached to GPIO Pin
- Minimum interval between two postings
- Number of Encoder wheel slots
Odometry Estimation ROS2 Package
Odometry estimation is a ROS2 module that estimates odometry based on a selected model and accepts odometry sensor inputs (wheel rpm). Only a differential drive model has been used so far, and forward kinematics are determined using information from the wheel encoders. Once it calculates the odometry, it publish to the /odom topic