Jetracer Steuerung: Unterschied zwischen den Versionen
Zur Navigation springen
Zur Suche springen
Keine Bearbeitungszusammenfassung |
|||
| Zeile 9: | Zeile 9: | ||
=='''serielle Benutzer Gruppe hinzufügen'''== | =='''serielle Benutzer Gruppe hinzufügen'''== | ||
*Geben Sie den Befehl ls /dev in jetson nano ein, um zu prüfen, ob die Treiberplatine normal mit | *Geben Sie den Befehl ls /dev in jetson nano ein, um zu prüfen, ob die Treiberplatine normal mit jetracer verbunden ist und ob die Geräte ttyACM0 und ttyACM1 gefunden werden. (Wobei ttyACM0 für die Kommunikation mit dem Mikrocontroller und ttyACM1 für die Kommunikation mit dem Radargerät verwendet wird). | ||
ls /dev | ls /dev | ||
[[Datei:JetRacer_Steuerung_Group_Step01.png|Step01]] | [[Datei:JetRacer_Steuerung_Group_Step01.png|Step01]] | ||
| Zeile 17: | Zeile 17: | ||
sudo adduser jetson dialout #Hinzufügen des aktuellen Benutzers zur Benutzergruppe dialout, in der sich die serielle Schnittstelle befindet | sudo adduser jetson dialout #Hinzufügen des aktuellen Benutzers zur Benutzergruppe dialout, in der sich die serielle Schnittstelle befindet | ||
[[Datei:JetRacer_Steuerung_Group_Step02.png|Step02]] | [[Datei:JetRacer_Steuerung_Group_Step02.png|Step02]] | ||
*Geben Sie den Befehl „sudo reboot“ ein, um neu zu starten, das Passwort ist | *Geben Sie den Befehl „sudo reboot“ ein, um neu zu starten, das Passwort ist jetson | ||
*<span style="color:red">Der obige Befehl zum Hinzufügen kann erst nach dem Neustart wirksam werden, und wenn keine Berechtigung für den seriellen Anschluss besteht, meldet der Roboterchassis-Knoten nach dem Hochfahren immer einen Fehler.</span> | *<span style="color:red">Der obige Befehl zum Hinzufügen kann erst nach dem Neustart wirksam werden, und wenn keine Berechtigung für den seriellen Anschluss besteht, meldet der Roboterchassis-Knoten nach dem Hochfahren immer einen Fehler.</span> | ||
sudo reboot #restart jetson nano | sudo reboot #restart jetson nano | ||
| Zeile 27: | Zeile 27: | ||
*Der folgende roslaunch-Befehl startet auch automatisch den Master-Knoten, aber der Zweck des Starts des Master-Knotens allein ist es, die Verbindung zur virtuellen Maschine ständig aufrechtzuerhalten. Andernfalls wird der Master-Knoten automatisch geschlossen, wenn der Chassis-Knoten geschlossen wird, was dazu führt, dass die virtuelle Maschine nicht mehr verbunden ist. | *Der folgende roslaunch-Befehl startet auch automatisch den Master-Knoten, aber der Zweck des Starts des Master-Knotens allein ist es, die Verbindung zur virtuellen Maschine ständig aufrechtzuerhalten. Andernfalls wird der Master-Knoten automatisch geschlossen, wenn der Chassis-Knoten geschlossen wird, was dazu führt, dass die virtuelle Maschine nicht mehr verbunden ist. | ||
*Geben Sie den folgenden Befehl ein, um den Roboter-Chassis-Knoten zu starten. | *Geben Sie den folgenden Befehl ein, um den Roboter-Chassis-Knoten zu starten. | ||
roslaunch | roslaunch jetracer_ros jetracer.launch #Start des Roboter Chassis Knoten | ||
[[Datei:JetRacer_Steuerung_Node_Step02.png|Step03]] | [[Datei:JetRacer_Steuerung_Node_Step02.png|Step03]] | ||
*Öffnen Sie das Terminal der virtuellen Ubuntu-Maschine und geben Sie den folgenden Befehl in das Terminal ein, um zu überprüfen, ob die Kommunikationsverbindung zwischen den Maschinen normal funktioniert. | *Öffnen Sie das Terminal der virtuellen Ubuntu-Maschine und geben Sie den folgenden Befehl in das Terminal ein, um zu überprüfen, ob die Kommunikationsverbindung zwischen den Maschinen normal funktioniert. | ||
| Zeile 55: | Zeile 55: | ||
=='''Steuerung per Tastatur'''== | =='''Steuerung per Tastatur'''== | ||
*Press "Ctrl+Alt+t" on the Ubuntu virtual machine to open a new terminal, and enter the following command to open the keyboard control topic node. | *Press "Ctrl+Alt+t" on the Ubuntu virtual machine to open a new terminal, and enter the following command to open the keyboard control topic node. | ||
roslaunch | roslaunch jetracer_ros keyboard.launch | ||
[[Datei:JetRacer_Steuerung_Keyboard_Step01.png|Step01]] | [[Datei:JetRacer_Steuerung_Keyboard_Step01.png|Step01]] | ||
*At this point, you can use the up and down keys to control the movement of the robot, and the movement data can be viewed in the topics received by the robot terminal. | *At this point, you can use the up and down keys to control the movement of the robot, and the movement data can be viewed in the topics received by the robot terminal. | ||
| Zeile 63: | Zeile 63: | ||
=='''Steuerung per Kontroller'''== | =='''Steuerung per Kontroller'''== | ||
*Check the USB receiver of the gamepad to the computer, and a box will pop up, please select Connect to Virtual Machine -> Ubuntu | *Check the USB receiver of the gamepad to the computer, and a box will pop up, please select Connect to Virtual Machine -> Ubuntu Jetracer. | ||
[[Datei:JetRacer_Steuerung_Kontroller_Step01.png|Step01]] | [[Datei:JetRacer_Steuerung_Kontroller_Step01.png|Step01]] | ||
*Run the following command in the virtual machine to test whether the gamepad is connected normally [Note: Connect the receiver of the gamepad to the virtual machine for control, if the gamepad is connected to the jetson nano for control, there will be serious delays] | *Run the following command in the virtual machine to test whether the gamepad is connected normally [Note: Connect the receiver of the gamepad to the virtual machine for control, if the gamepad is connected to the jetson nano for control, there will be serious delays] | ||
| Zeile 74: | Zeile 74: | ||
*Press "Ctrl+C" to end the node. | *Press "Ctrl+C" to end the node. | ||
*Enter the following command in the virtual machine to start the gamepad control node. | *Enter the following command in the virtual machine to start the gamepad control node. | ||
roslaunch | roslaunch jetracer_ros joy.launch | ||
[[Datei:JetRacer_Steuerung_Kontroller_Step04.png|Step04]] | [[Datei:JetRacer_Steuerung_Kontroller_Step04.png|Step04]] | ||
*Turn on the power of the handle, press the HOME button, a red light will be displayed, then press and hold the A button, and control the left joystick at the same time to control the movement of the robot; release the A button, the robot stops. | *Turn on the power of the handle, press the HOME button, a red light will be displayed, then press and hold the A button, and control the left joystick at the same time to control the movement of the robot; release the A button, the robot stops. | ||
[[Datei:JetRacer_Steuerung_Kontroller_Step05.png|Step05]] | [[Datei:JetRacer_Steuerung_Kontroller_Step05.png|Step05]] | ||
*If the remote control fails, you can enter the following command in the virtual machine, open the ~/catkin_ws/src/ | *If the remote control fails, you can enter the following command in the virtual machine, open the ~/catkin_ws/src/jetracer_ros/scripts/teleop_joy.py program, and change the values of axes[ ] and buttons[ ] to the actual corresponding button values. | ||
sudo nano catkin_ws/src/ | sudo nano catkin_ws/src/jetracer_ros/scripts/teleop_joy.py #Open the remote control program file | ||
[[Datei:JetRacer_Steuerung_Kontroller_Step06.png|Step06]] | [[Datei:JetRacer_Steuerung_Kontroller_Step06.png|Step06]] | ||
Version vom 15. Dezember 2024, 15:54 Uhr
- Verschiedene manuelle Steuerungsmodi
- Die verschiedenen Möglichkeiten wie der JetRacer gesteuert werden kann werden im Tutorial Robot Movement Control beschrieben. Hierbei ist zu beachten das beim Befehl "sudo adduser jetbot dialout" welcher den User hinzufügt, das jetbot durch ein jetracer ersetzt werden muss.
- Steuerung per Node Publishing
- Wie im Tutorial beschrieben kann der Roboter anhand einer Publishing Note Befehl für Befehl gesteuert werden. Dies ist zu Beginn nützlich um zu testen ob alle Bewegungsmöglichkeiten funktionieren.
- Steuerung per Tastatur
- Ebenfalls kann der Roboter per Tastatur gesteuert werden. Dieser Modus läuft flüssiger als die Publishing Node, ist aber gewöhnungsbedürftig.
- Steuerung per Joystick
- Der intuitivste Steurungsmodus ist das steuern per Game Controller, hier genannt Joystick. Für diesen Modus muss allerdings erst der Controller mit der Virtualbox verbunden werden. Hierfür muss in den Einstellungen der VM der Controller als USB Input Gerät festgelegt werden. Außerdem muss vielleicht der Input an der Virtualbox von js0 auf js1 geändert werden, da sonst die Maus als Input für die Steuerung benutzt wird. In diesem Tutorial: Assign specific device input paths wird beschrieben wie dies in einer ubunutu Umgebung möglich ist.
serielle Benutzer Gruppe hinzufügen
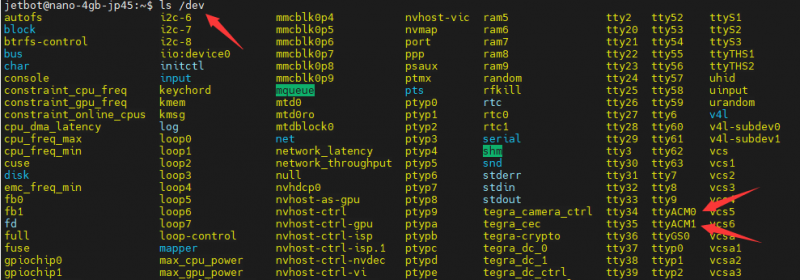
- Geben Sie den Befehl ls /dev in jetson nano ein, um zu prüfen, ob die Treiberplatine normal mit jetracer verbunden ist und ob die Geräte ttyACM0 und ttyACM1 gefunden werden. (Wobei ttyACM0 für die Kommunikation mit dem Mikrocontroller und ttyACM1 für die Kommunikation mit dem Radargerät verwendet wird).
ls /dev
- Geben Sie den folgenden Befehl ein, um die Benutzergruppe für den seriellen Anschluss hinzuzufügen, andernfalls haben Sie keine Berechtigung, den seriellen Anschluss zu bedienen. Wenn das konfigurierte System bereits Berechtigungen hinzugefügt hat, können Sie diesen Schritt überspringen.
ls -l /dev/ttyACM*           #Sehen sie die Einwahl der Benutzer Gruppe
id -Gn                       #Anzeige der Benutzergruppe, zu der der aktuelle Benutzer gehört; die erste Gruppe ist der aktuelle Benutzer
sudo adduser jetson dialout  #Hinzufügen des aktuellen Benutzers zur Benutzergruppe dialout, in der sich die serielle Schnittstelle befindet
- Geben Sie den Befehl „sudo reboot“ ein, um neu zu starten, das Passwort ist jetson
- Der obige Befehl zum Hinzufügen kann erst nach dem Neustart wirksam werden, und wenn keine Berechtigung für den seriellen Anschluss besteht, meldet der Roboterchassis-Knoten nach dem Hochfahren immer einen Fehler.
sudo reboot #restart jetson nano
Roboter Karosserie Knoten öffnen
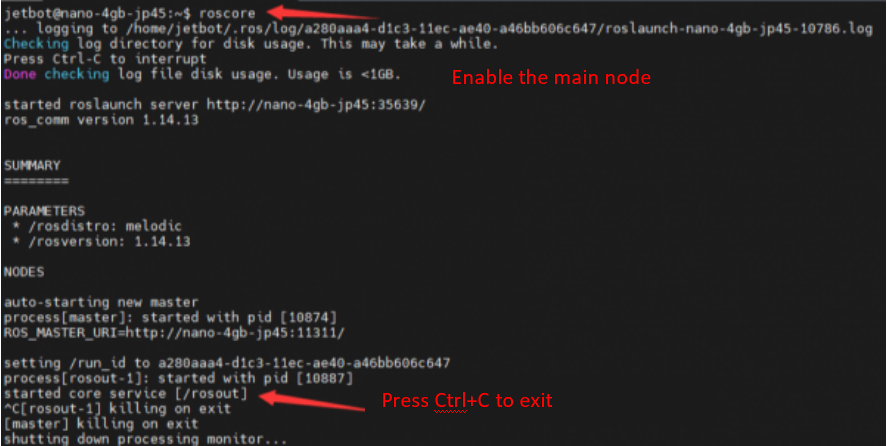
- Verbinden Sie SSH mit dem Roboter, um das Terminal zu öffnen, und geben Sie den folgenden Befehl ein, um den Roboter-Masterknoten zu starten.
roscore #Start des Roboter-Masterknotens
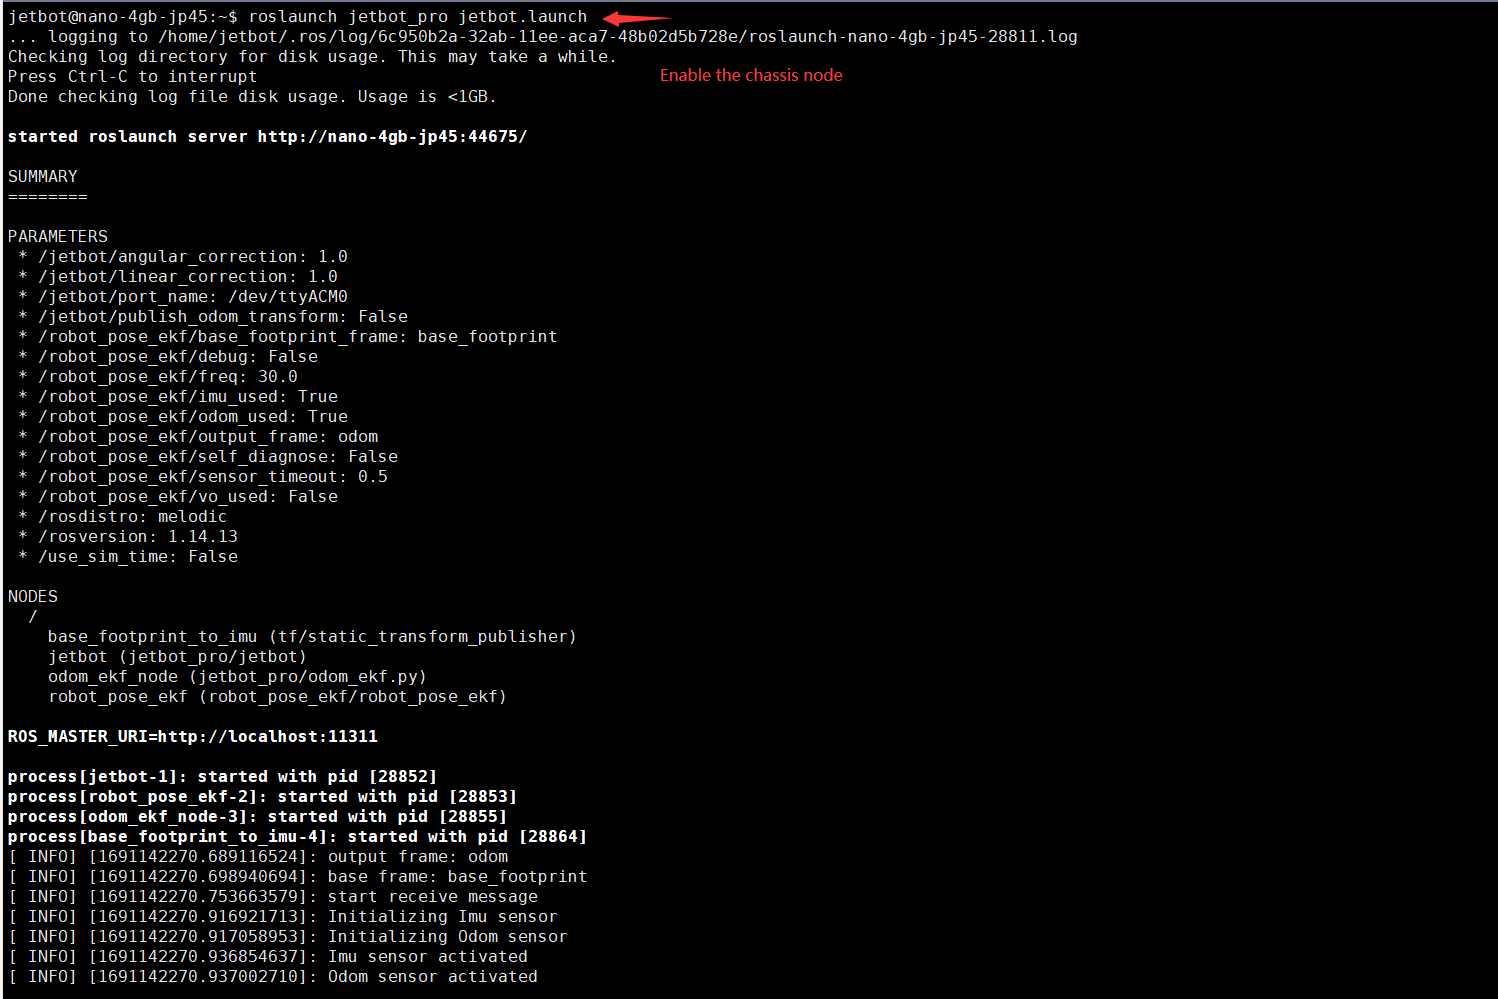
- Der folgende roslaunch-Befehl startet auch automatisch den Master-Knoten, aber der Zweck des Starts des Master-Knotens allein ist es, die Verbindung zur virtuellen Maschine ständig aufrechtzuerhalten. Andernfalls wird der Master-Knoten automatisch geschlossen, wenn der Chassis-Knoten geschlossen wird, was dazu führt, dass die virtuelle Maschine nicht mehr verbunden ist.
- Geben Sie den folgenden Befehl ein, um den Roboter-Chassis-Knoten zu starten.
roslaunch jetracer_ros jetracer.launch #Start des Roboter Chassis Knoten
- Öffnen Sie das Terminal der virtuellen Ubuntu-Maschine und geben Sie den folgenden Befehl in das Terminal ein, um zu überprüfen, ob die Kommunikationsverbindung zwischen den Maschinen normal funktioniert.
rostopic list
- Wenn nach der Ausführung des Befehls der in der Abbildung unten gezeigte Inhalt erscheint, bedeutet dies, dass die Kommunikation zwischen den verschiedenen Geräten erfolgreich ist; wenn keine Verbindung hergestellt werden kann, überprüfen Sie, ob die IP-Adresse und der Hostname in den obigen Schritten falsch sind oder ob sie mit demselben WiFi verbunden sind.
- /cmd_vel ist das Thema der Roboterbewegung und wird vom Roboter gesteuert.
- /imu ist das IMU-Thema des Roboters.
- /motor/* zeigt die aktuelle eingestellte Geschwindigkeit an und stellt die Geschwindigkeit des linken und rechten Motors ein.
- /odom ist der Kilometerzähler des Roboters.
- /odom_combined ist der Fusionskilometerzähler des Roboters, der sich aus der Kombination des kodierten Kilometerzählers mit den IMU-Daten ergibt.
Steuerung per Veröffentlichungs Knoten
- After the multi-machine communication is normal, please keep the robot chassis point running normally, and place the car on the ground.
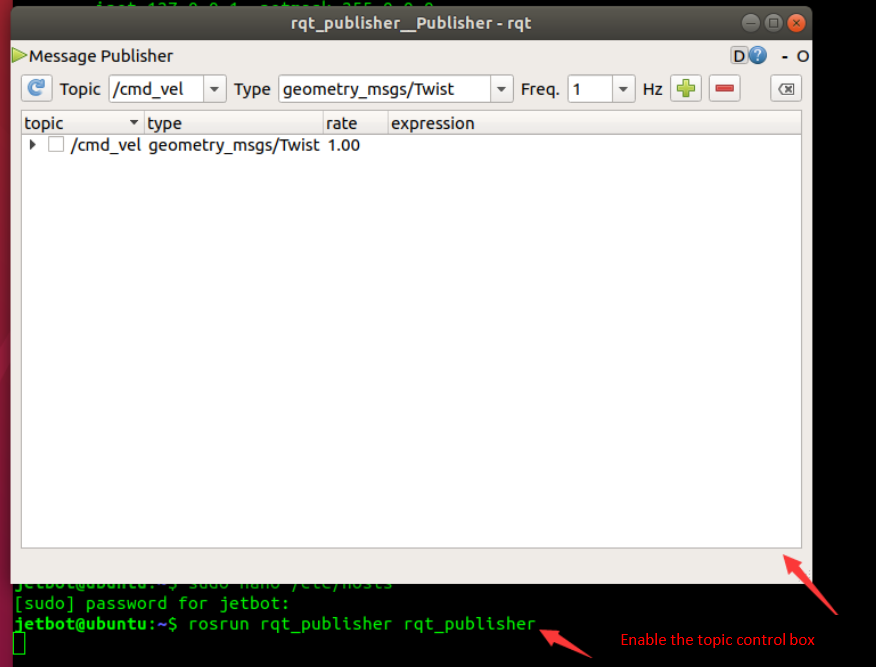
- Open a terminal in the Ubuntu virtual machine and enter the following command to start the topic publishing node.
rosrun rqt_publisher rqt_publisher #Start topic publishing node
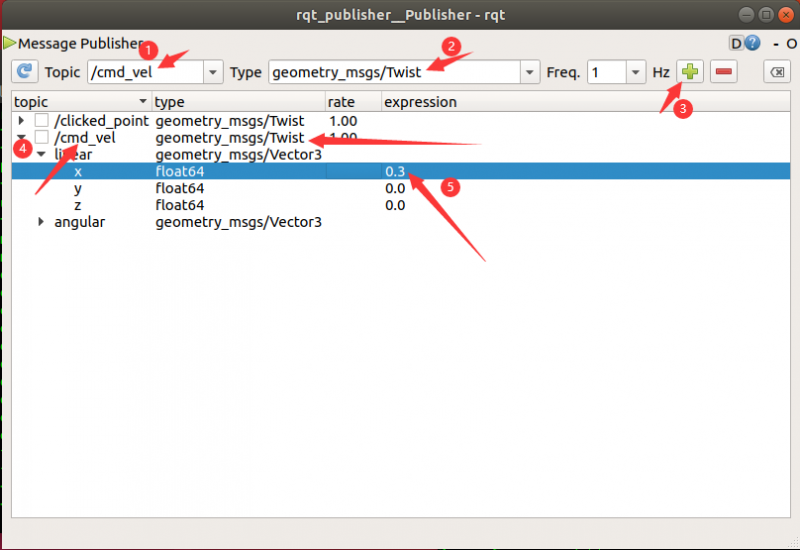
- In the pop-up window, please select the topic /cmd_vel, click "+" to create a new topic, /cmd_vel is the topic of controlling the motion of the robot, linear->x indicates the linear velocity of the robot, and angular->x indicates the angular velocity of the robot.
- Change the value of linear.x to 0.5, right-click and select publish selected Once to publish a topic, the robot will move forward 0.5 meters and then stop; if linear.x is changed to 0, angular. z is changed to 3.14, the robot will rotate half a circle.
- Note: The topic we see here is cmd_vel, please select Twist type, and choose other topics, the car may not move.
- Press Ctrl+C to close the topic publishing node.
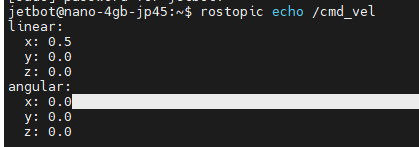
- Re-open a terminal on the robot side and enter the following command to view the topic information of the car movement.
rostopic echo /cmd_vel #Display /cmd_vel receives the topic
Steuerung per Tastatur
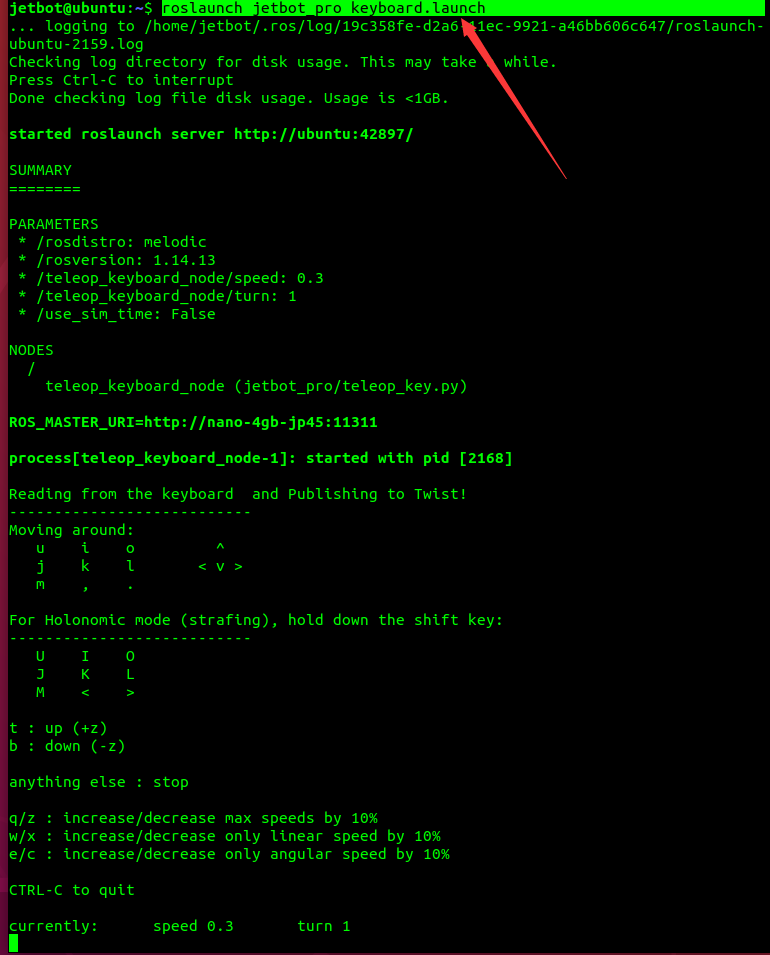
- Press "Ctrl+Alt+t" on the Ubuntu virtual machine to open a new terminal, and enter the following command to open the keyboard control topic node.
roslaunch jetracer_ros keyboard.launch
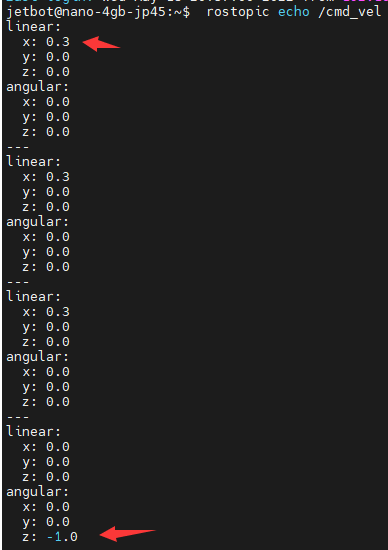
- At this point, you can use the up and down keys to control the movement of the robot, and the movement data can be viewed in the topics received by the robot terminal.
- Press ctrl+c to interrupt node running and exit.
- Note: The above controls are only valid when the robot master node and the robot chassis node are activated. If the robot does not move after pressing the button or modifying the corresponding value in the topic, it may be that the node is not turned on or the multi-machine communication is abnormal. Please check again. Node operation and multi-machine communication.
Steuerung per Kontroller
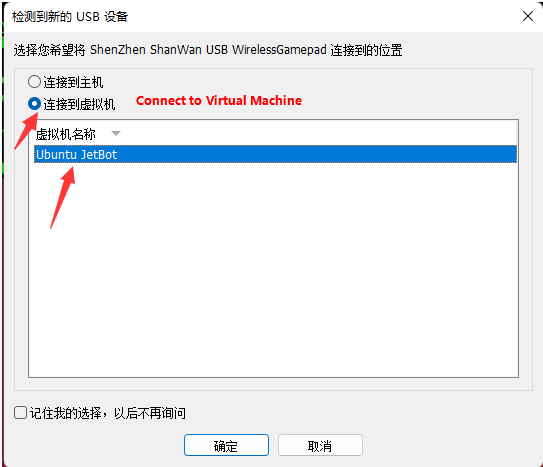
- Check the USB receiver of the gamepad to the computer, and a box will pop up, please select Connect to Virtual Machine -> Ubuntu Jetracer.
- Run the following command in the virtual machine to test whether the gamepad is connected normally [Note: Connect the receiver of the gamepad to the virtual machine for control, if the gamepad is connected to the jetson nano for control, there will be serious delays]
ls /dev/input/
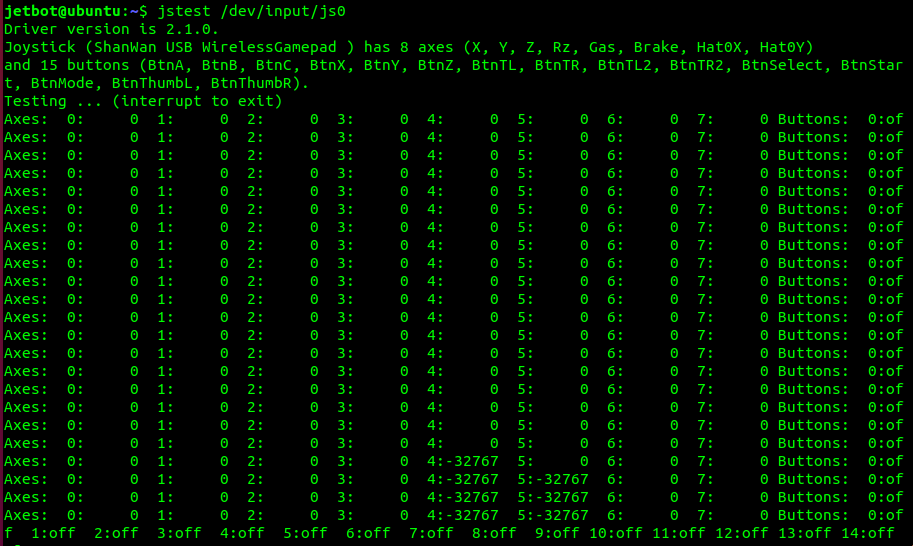
- Among them, js0 represents the game joystick handle, run the following command to test whether the game handle is normal.
jstest /dev/input/js0
- Press different buttons on the remote control handle, the corresponding button value will change.
- Press "Ctrl+C" to end the node.
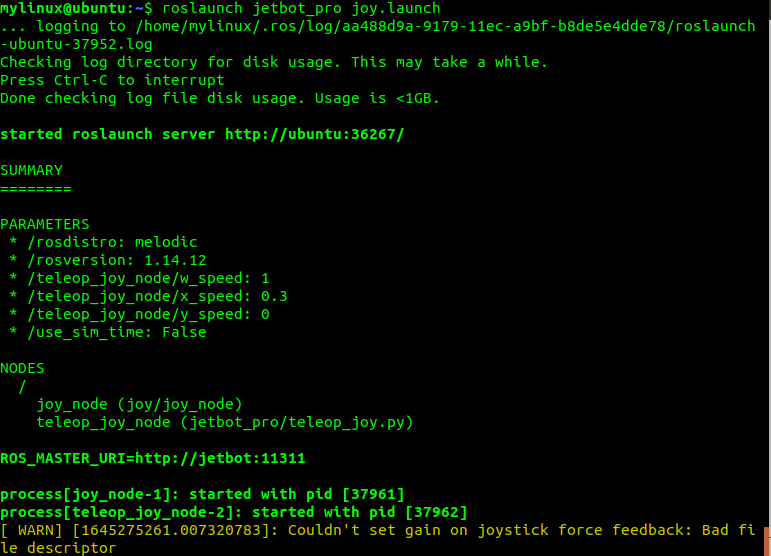
- Enter the following command in the virtual machine to start the gamepad control node.
roslaunch jetracer_ros joy.launch
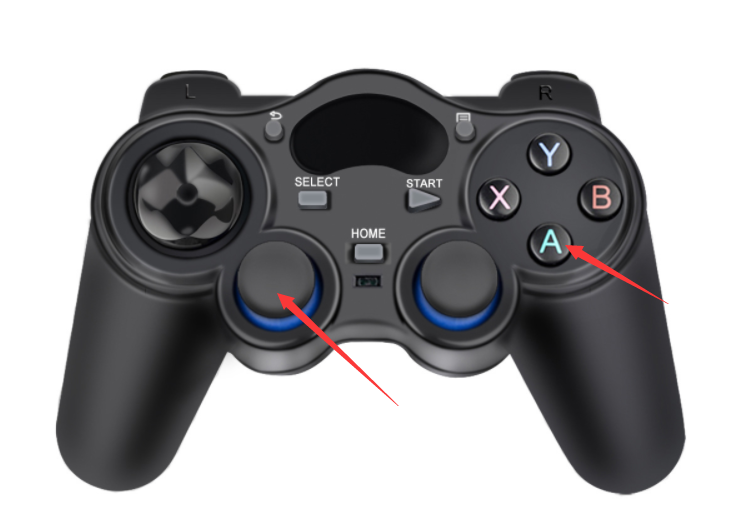
- Turn on the power of the handle, press the HOME button, a red light will be displayed, then press and hold the A button, and control the left joystick at the same time to control the movement of the robot; release the A button, the robot stops.
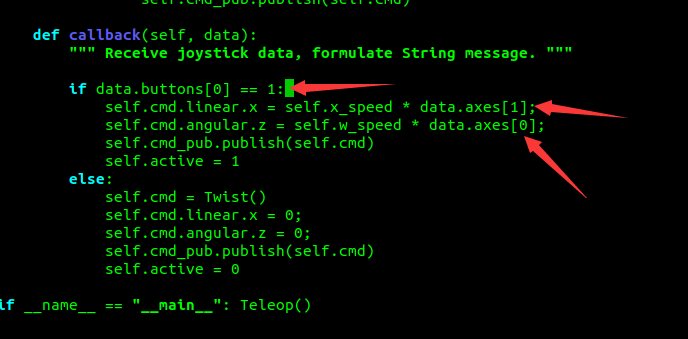
- If the remote control fails, you can enter the following command in the virtual machine, open the ~/catkin_ws/src/jetracer_ros/scripts/teleop_joy.py program, and change the values of axes[ ] and buttons[ ] to the actual corresponding button values.
sudo nano catkin_ws/src/jetracer_ros/scripts/teleop_joy.py #Open the remote control program file
