Jetracer Kamera: Unterschied zwischen den Versionen
Zur Navigation springen
Zur Suche springen
| Zeile 4: | Zeile 4: | ||
== '''Kamera Node einschalten''' == | == '''Kamera Node einschalten''' == | ||
* | *Re-open a terminal in the robot and run the following command to start the CSI camera node. | ||
roslaunch jetracer csi_camera.launch | |||
[[JetRacer_Kamera_Enable_Step01|Step 01]] | |||
*After starting the camera node, reopen a terminal in the virtual machine and run the following command to start the image viewing interface. | |||
rosrun rqt_image_view rqt_image_view | |||
[[JetRacer_Kamera_Enable_Step02|Step 02]] | |||
*There are two topics, /csi_cam_0/image_raw and /csi_cam_0/image_raw/compressed, in the upper right corner, which represent raw data and compressed data respectively. It is recommended to choose compressed data to reduce bandwidth. | |||
== '''Video in RVIZ anschauen''' == | == '''Video in RVIZ anschauen''' == | ||
Version vom 9. Dezember 2024, 16:28 Uhr
- Kamera (Vll. Bild der Kamera)
- In diesem Tutorial: Start the Camera Node wird beschrieben wie man die Kamera des JetRacers initial einschaltet und das aufgenommene Video entweder in RViz in der Virtualbox oder im Browser anschauen kann. Außerdem wird hier beschrieben wie die Kamera, anhand eines Python Skripts und eines beigelegten Schachbrettmusters, kalibriert werden kann. Für eine einfachere Kalibrierung kann aber auch das Schachbrett welches im Autonome Systeme Labor vorhanden ist benutzt werden. Hierfür muss dann lediglich die Größe des Brettes im Befehl, welcher die Kalibrierung startet, auf die neuen Werte angepasst werden.
Kamera Node einschalten
- Re-open a terminal in the robot and run the following command to start the CSI camera node.
roslaunch jetracer csi_camera.launch
- After starting the camera node, reopen a terminal in the virtual machine and run the following command to start the image viewing interface.
rosrun rqt_image_view rqt_image_view
- There are two topics, /csi_cam_0/image_raw and /csi_cam_0/image_raw/compressed, in the upper right corner, which represent raw data and compressed data respectively. It is recommended to choose compressed data to reduce bandwidth.
Video in RVIZ anschauen
Kamera kalibrieren
- Run the following command in the virtual machine to start the calibration image interface
rosrun camera_calibration cameracalibrator.py --size 5x7 --square 0.03 image:=/csi_cam_0/image_raw camera:=/csi_cam_0
- Among which:
- size: The number of intersections of black and white grids to calibrate the chessboard, this uses 5x7 intersections.
- square: the side length of the checkerboard, in meters.
- image and camera: Set the topic of images posted by the camera.
- Hier kann auch das Schachbrett welches im Labor ist benutzt werden, dann müssen aber die size und square Werte im Befehl entsprechen angepasst werden.
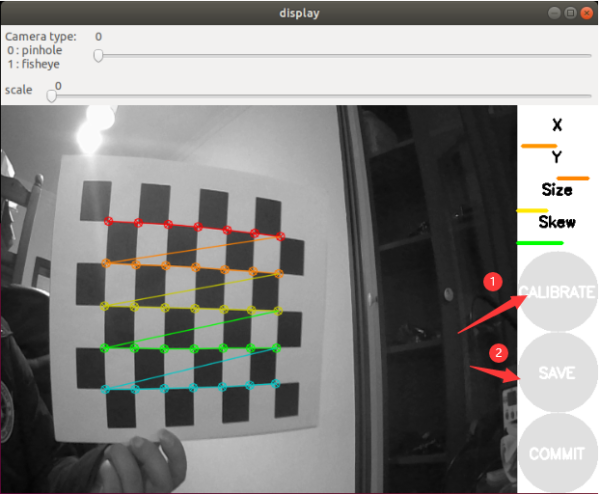
- In order to obtain better calibration results, it is necessary to move the checkerboard to different positions of the image, especially the edge positions of the image. When the CALIBRATE button changes from gray to green, it means that enough data has been collected, you can click CALIBRATE to view the results.
- Click the "CALIBRATE" button, the calibration program automatically calculates the calibration parameters, it takes a while, the interface may become gray and unresponsive, be careful not to close it and wait for a while.
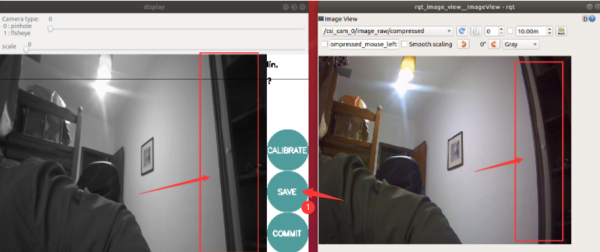
- After the calibration is completed, you can see the calibrated image through the graphical interface. By comparison, you can find that there is a deformation on the right side until a good calibration effect is obtained.
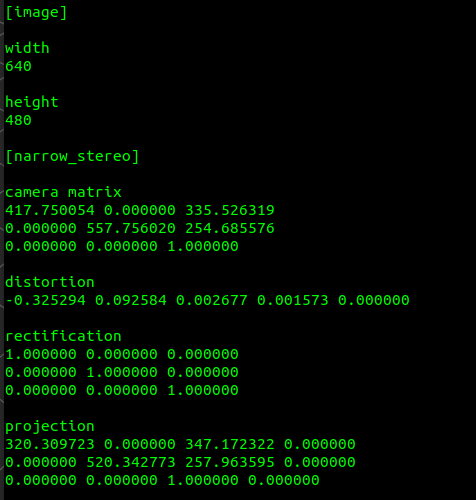
- Click "SAVE" to save the calibration data to the temporary file of the virtual machine, click "COMMIT" to save the calibration file to the robot configuration file, the default directory is
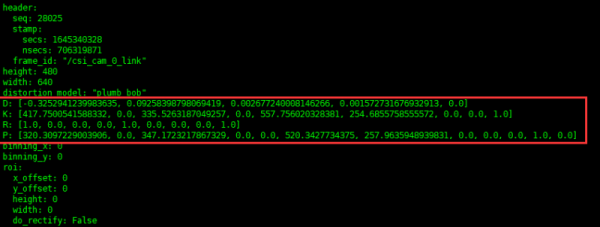
- After restarting the camera node, run the following command to check that the calibration parameters have been updated.
rostopic echo /camera_info
- [Note: At this time, the image viewed through image_view or RVIZ is still the original image of the camera, not the calibrated image. If the calibration image is displayed, it will be introduced in the OpenCV tutorial.]


