Installation guide: Unterschied zwischen den Versionen
Keine Bearbeitungszusammenfassung |
Keine Bearbeitungszusammenfassung |
||
| Zeile 27: | Zeile 27: | ||
[[Datei:Ubuntu1.jpg|left|mini|300px|Abb.1 <nowiki></nowiki>]] | [[Datei:Ubuntu1.jpg|left|mini|300px|Abb.1 <nowiki></nowiki>]] | ||
<br clear = all> | |||
== ROS2 == | == ROS2 == | ||
Version vom 8. Februar 2022, 21:27 Uhr
Ubuntu
In addition to Windows 10, Ubuntu 20.04 is installed on the laboratory computers in the control engineering laboratory. The computers automatically start the Windows operating system. To start Ubuntu, the F12 key must be pressed at the beginning of the boot process. This opens the start menu. In the start menu, a boot option can be selected using the arrow keys. Two hard disks are available in the Legacy Boot area. The Windows operating system is installed on the 240GB SSD and a partition with Ubuntu is on the 1000GB HDD. After selecting the HDD, confirm with Enter and the Ubuntu operating system is loaded. The password under Ubuntu is Hshl2021 for all lab computers.
We'll show you how to install Ubuntu Server on a Raspberry Pi 4, connect it to the internet, and use it remotely in this article. There are two ways to set up your Pi: with an external HDMI screen and USB keyboard, or without. We utilized the first one, which came with an additional HDMI screen and a USB keyboard.
Installation of Ubuntu in Raspberry Pi 4
Step # 01
In the beginning, we have to insert the microSD card into our computer.
We must be careful to install the suitable Imager program for our operating system.
When we are on Ubuntu (as operating system), we can simply run the following command to install the Raspberry Pi Imager:
sudo snap install rpi-imager
Step # 02
After the installation of Imager, open the application and go to the "CHOOSE OS" option.
Now, look for the “Other general-purpose OS” option and select it.
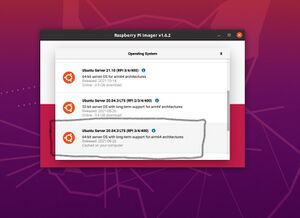
After that, you can choose Ubuntu from a list of download alternatives. We recommend that you download Ubuntu 20.04 for this purpose. This will work for the Raspberry Pi 2,3, 3+, and any of the 4's, as mentioned in the imager.
