Installation guide: Unterschied zwischen den Versionen
Keine Bearbeitungszusammenfassung |
|||
| (37 dazwischenliegende Versionen desselben Benutzers werden nicht angezeigt) | |||
| Zeile 4: | Zeile 4: | ||
We'll show you how to install Ubuntu Server on a Raspberry Pi 4, connect it to the internet, and use it remotely in this article. There are two ways to set up your Pi: with an external HDMI screen and USB keyboard, or without. We utilized the first one, which came with an additional HDMI screen and a USB keyboard. | We'll show you how to install Ubuntu Server on a Raspberry Pi 4, connect it to the internet, and use it remotely in this article. There are two ways to set up your Pi: with an external HDMI screen and USB keyboard, or without. We utilized the first one, which came with an additional HDMI screen and a USB keyboard. | ||
=== Installation of Ubuntu | === Installation of Ubuntu on RPi 4 === | ||
==== Step | ==== Step 01 ==== | ||
In the beginning, we have to insert the microSD card into our computer. | In the beginning, we have to insert the microSD card into our computer. | ||
| Zeile 18: | Zeile 18: | ||
==== Step | ==== Step 02 ==== | ||
After the installation of Imager, open the application and go to the "CHOOSE OS" option. | After the installation of Imager, open the application and go to the "CHOOSE OS" option. | ||
| Zeile 24: | Zeile 24: | ||
Now, look for the “Other general-purpose OS” option and select it. | Now, look for the “Other general-purpose OS” option and select it. | ||
After that, you can choose Ubuntu from a list of download alternatives. | After that, you can choose Ubuntu from a list of download alternatives. <code>Ubuntu 20.04.3 LTS (RPi 3/4/400)</code> is recommended for this purpose. This will work for the Raspberry Pi 2,3, 3+, and any of the 4's, as mentioned in the imager. | ||
[[Datei:Ubuntu1.jpg| | [[Datei:Ubuntu1.jpg|left|mini|300px|Abb.1 <nowiki></nowiki>]] | ||
<br clear = all> | |||
We open the "SD Card" menu after selecting the image. Then choose the microSD card that we have inserted. | |||
[[Datei:Ubuntu2.png|right|mini|400px|Abb.2 <nowiki></nowiki>]] | |||
<br clear = all> | |||
==== Step 03 ==== | |||
Until this point, we have selected the right operating system and SD card. In the last step, we just click on "WRITE" option to begin the intallation of Ubuntu server in our Rpi 4. It may take few minutes and below it is shown how your screen will look like after clicking on "WRITE" and it means that we have come all good so far. | |||
[[Datei:Ubuntu3.png|left|mini|300px|Abb.3 <nowiki></nowiki>]] | |||
<br clear = all> | |||
Congratulations! We have finally installed Ubuntu server completely. Now, we will configure WiFi on our Raspberry Pi 4 with Ubuntu 20.04 LTS 64-bit ARM Server. | |||
=== Configuration of WiFi on Rpi 4 === | |||
After working with our Rpi using Ethernet for couple of days, we wanted to get rid of connecting our microprocessor each time with Ethernet cable, so we came up with idea of connecting WiFi with it. | |||
In order to configure wifi, we need following information: | |||
(i) Raspberry Pi wireless card name on your system; | |||
(ii) WiFi router name you are trying to login (SSID), and | |||
(iii) WiFi login password | |||
==== Step 01 ==== | |||
The first step is to figure out what your wireless network interface's name is. To do so, execute this: | |||
$ ls /sys/class/net | |||
enp0s25 lo wlp3s0 | |||
The wireless network interface name on an Ubuntu 20.04 machine could be something like wlan0 or wlp3s0. In our case, it was wlan0. | |||
==== Step 02 ==== | |||
Next, go to the /etc/netplan directory and find the Netplan configuration files you need. 01-network-manager-all.yaml or 50-cloud-init.yaml are examples of configuration files. | |||
$ ls /etc/netplan/ | |||
==== Step 03 ==== | |||
Edit network configuration file to add WiFi info: | |||
$ sudoedit /etc/netplan/50-cloud-init.yaml | |||
After executing this, you will see the following screen: | |||
[[Datei:WiFi1.jpg|left|mini|300px|Abb.1 <nowiki></nowiki>]] | |||
<br clear = all> | |||
Now add the following details as shown in the image below: | |||
[[Datei:WiFi2.jpg|left|mini|300px|Abb.2 <nowiki></nowiki>]] | |||
<br clear = all> | |||
==== Step 04 ==== | |||
By using the ip command, we will be able to see our wireless adapter linked to the wireless network if everything went well: | |||
$ ip a | |||
Hence, we have successfully configured WiFi on our RPi 4. | |||
== ROS2 == | == ROS2 == | ||
The creation of ROS2 was proposed to solve the performance constraints of ROS1 due to its lack of support for real-time performance. | |||
Any robot platform's software stack requires a number of software tools, including hardware drivers, networking modules, communication architecture, and a number of robot algorithms. ROS brings all of these tools together in one place, eliminating the need for developers to recreate the wheel. ROS is more than just a middleware, and the numerous solutions and packages available for robot navigation, perception, control, motion planning, simulation, and more make it impossible to ignore. | |||
=== Installation of ROS2 on RPi4 === | |||
We can install ROS2 in two ways: | |||
i) from binary packages | |||
ii) building from source. | |||
In this project, we installed ROS2 using Debian packages (from binary packages) on RPi 4. The installation is more convenient using Debian packages because it automatically installs all of the required dependencies. It also receives updates at the same time as the rest of the system. | |||
==== Setup Sources ==== | |||
First, we will begin with 'Setup Sources' step. You might see the same error <code>could not get lock /var/lib/dpkg/lock-frontend</code> as shown in the image below after just running the first line of command in setup sources step. | |||
sudo apt update && sudo apt install curl gnupg2 lsb-release | |||
Just execute the following commands to solve this problem. | |||
[[Datei:ROSint1.jpg|right|mini|400px|Abb.1 <nowiki></nowiki>]] | |||
<br clear = all> | |||
sudo rm /var/lib/apt/lists/lock && sudo rm /var/cache/apt/archives/lock && sudo rm /var/lib/dpkg/lock | |||
sudo rm /var/lib/apt/lists/lock && sudo rm /var/cache/apt/archives/lock && sudo rm /var/lib/dpkg/lock* | |||
configure dpkg --configure -a | |||
sudo apt update | |||
[[Datei:ROSint2.jpg|left|mini|400px|Abb.1 <nowiki></nowiki>]] | |||
<br clear = all> | |||
Now you can execute second line of setup sources command: | |||
sudo apt update && sudo apt install curl gnupg2 lsb-release | |||
then you can add repository to sources list: | |||
echo "deb [arch=$(dpkg --print-architecture) signed-by=/usr/share/keyrings/ros-archive-keyring.gpg] http://packages.ros.org/ros2/ubuntu $(source /etc/os-release && echo $UBUNTU_CODENAME) main" | sudo tee /etc/apt/sources.list.d/ros2.list > /dev/null | |||
==== Install ROS 2 Packages ==== | |||
After adding repository, you will have to update apt repository: | |||
sudo apt update | |||
One thing we have to be careful while installing ROS2 packages is that we do not need to install the command for desktop: | |||
sudo apt install ros-foxy-desktop | |||
Instead, we have to install the one that is not for GUI tools: | |||
sudo apt install ros-foxy-ros-base | |||
After this step, only sourcing the setup script is needed to be done. | |||
==== Environment Setup ==== | |||
source /opt/ros/foxy/setup.bash | |||
and eventually the installation of ROS 2 on Raspberry Pi is complete. | |||
Aktuelle Version vom 15. März 2022, 15:51 Uhr
Ubuntu
In addition to Windows 10, Ubuntu 20.04 is installed on the laboratory computers in the control engineering laboratory. The computers automatically start the Windows operating system. To start Ubuntu, the F12 key must be pressed at the beginning of the boot process. This opens the start menu. In the start menu, a boot option can be selected using the arrow keys. Two hard disks are available in the Legacy Boot area. The Windows operating system is installed on the 240GB SSD and a partition with Ubuntu is on the 1000GB HDD. After selecting the HDD, confirm with Enter and the Ubuntu operating system is loaded. The password under Ubuntu is Hshl2021 for all lab computers.
We'll show you how to install Ubuntu Server on a Raspberry Pi 4, connect it to the internet, and use it remotely in this article. There are two ways to set up your Pi: with an external HDMI screen and USB keyboard, or without. We utilized the first one, which came with an additional HDMI screen and a USB keyboard.
Installation of Ubuntu on RPi 4
Step 01
In the beginning, we have to insert the microSD card into our computer.
We must be careful to install the suitable Imager program for our operating system.
When we are on Ubuntu (as operating system), we can simply run the following command to install the Raspberry Pi Imager:
sudo snap install rpi-imager
Step 02
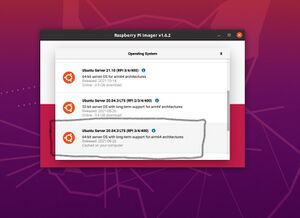
After the installation of Imager, open the application and go to the "CHOOSE OS" option.
Now, look for the “Other general-purpose OS” option and select it.
After that, you can choose Ubuntu from a list of download alternatives. Ubuntu 20.04.3 LTS (RPi 3/4/400) is recommended for this purpose. This will work for the Raspberry Pi 2,3, 3+, and any of the 4's, as mentioned in the imager.
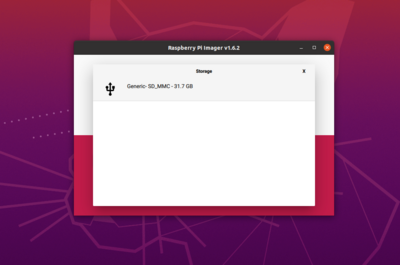
We open the "SD Card" menu after selecting the image. Then choose the microSD card that we have inserted.
Step 03
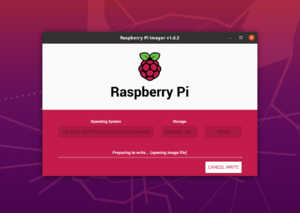
Until this point, we have selected the right operating system and SD card. In the last step, we just click on "WRITE" option to begin the intallation of Ubuntu server in our Rpi 4. It may take few minutes and below it is shown how your screen will look like after clicking on "WRITE" and it means that we have come all good so far.
Congratulations! We have finally installed Ubuntu server completely. Now, we will configure WiFi on our Raspberry Pi 4 with Ubuntu 20.04 LTS 64-bit ARM Server.
Configuration of WiFi on Rpi 4
After working with our Rpi using Ethernet for couple of days, we wanted to get rid of connecting our microprocessor each time with Ethernet cable, so we came up with idea of connecting WiFi with it. In order to configure wifi, we need following information:
(i) Raspberry Pi wireless card name on your system;
(ii) WiFi router name you are trying to login (SSID), and
(iii) WiFi login password
Step 01
The first step is to figure out what your wireless network interface's name is. To do so, execute this:
$ ls /sys/class/net
enp0s25  lo  wlp3s0
The wireless network interface name on an Ubuntu 20.04 machine could be something like wlan0 or wlp3s0. In our case, it was wlan0.
Step 02
Next, go to the /etc/netplan directory and find the Netplan configuration files you need. 01-network-manager-all.yaml or 50-cloud-init.yaml are examples of configuration files.
$ ls /etc/netplan/
Step 03
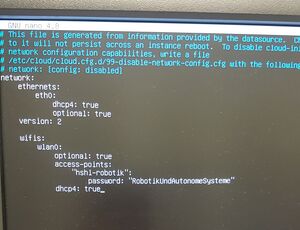
Edit network configuration file to add WiFi info:
$ sudoedit /etc/netplan/50-cloud-init.yaml
After executing this, you will see the following screen:
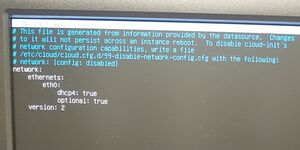
Now add the following details as shown in the image below:
Step 04
By using the ip command, we will be able to see our wireless adapter linked to the wireless network if everything went well:
$ ip a
Hence, we have successfully configured WiFi on our RPi 4.
ROS2
The creation of ROS2 was proposed to solve the performance constraints of ROS1 due to its lack of support for real-time performance.
Any robot platform's software stack requires a number of software tools, including hardware drivers, networking modules, communication architecture, and a number of robot algorithms. ROS brings all of these tools together in one place, eliminating the need for developers to recreate the wheel. ROS is more than just a middleware, and the numerous solutions and packages available for robot navigation, perception, control, motion planning, simulation, and more make it impossible to ignore.
Installation of ROS2 on RPi4
We can install ROS2 in two ways:
i) from binary packages
ii) building from source.
In this project, we installed ROS2 using Debian packages (from binary packages) on RPi 4. The installation is more convenient using Debian packages because it automatically installs all of the required dependencies. It also receives updates at the same time as the rest of the system.
Setup Sources
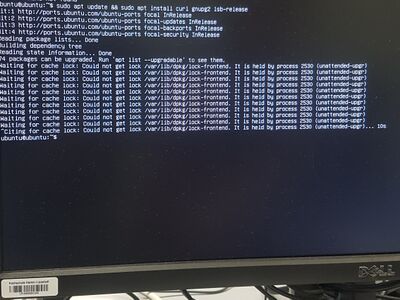
First, we will begin with 'Setup Sources' step. You might see the same error could not get lock /var/lib/dpkg/lock-frontend as shown in the image below after just running the first line of command in setup sources step.
sudo apt update && sudo apt install curl gnupg2 lsb-release
Just execute the following commands to solve this problem.
sudo rm /var/lib/apt/lists/lock && sudo rm /var/cache/apt/archives/lock && sudo rm /var/lib/dpkg/lock


sudo rm /var/lib/apt/lists/lock && sudo rm /var/cache/apt/archives/lock && sudo rm /var/lib/dpkg/lock*


configure dpkg --configure -a
sudo apt update
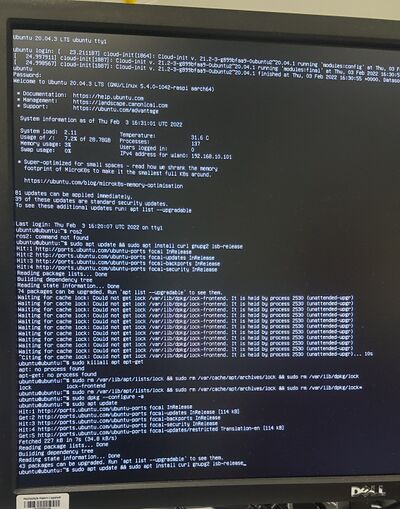
Now you can execute second line of setup sources command:
sudo apt update && sudo apt install curl gnupg2 lsb-release
then you can add repository to sources list:
echo "deb [arch=$(dpkg --print-architecture) signed-by=/usr/share/keyrings/ros-archive-keyring.gpg] http://packages.ros.org/ros2/ubuntu $(source /etc/os-release && echo $UBUNTU_CODENAME) main" | sudo tee /etc/apt/sources.list.d/ros2.list > /dev/null
Install ROS 2 Packages
After adding repository, you will have to update apt repository:
sudo apt update
One thing we have to be careful while installing ROS2 packages is that we do not need to install the command for desktop:
sudo apt install ros-foxy-desktop
Instead, we have to install the one that is not for GUI tools:
sudo apt install ros-foxy-ros-base
After this step, only sourcing the setup script is needed to be done.
Environment Setup
source /opt/ros/foxy/setup.bash
and eventually the installation of ROS 2 on Raspberry Pi is complete.