Kategorie:TopCon
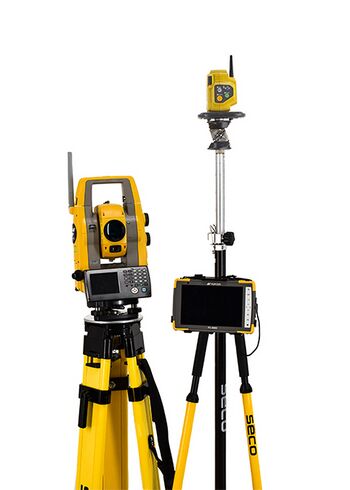
| Autor: | Prof. Dr.-Ing. Schneider |
Einleitung
![]() You can find the english version of this article here.
You can find the english version of this article here.
Warnung

Der vom Topcon ausgestrahlte Laserstrahl kann Augenschäden verursachen. Achten Sie darauf, den Laserstrahl nicht in die Augen anderer zu richten.
Übersicht
Dokumentation
- Kursanleitung Robotik Station (PS series, DE, 1,2 MB)
- TopCon Instruction Manual Power Station (PS series, EN, 5 MB)
Demo
Software
Ausrüstung
Getting Started
Hardware
Hardware setup guide for Topcon prism detection and tracking functionality:
- Place the Topcon in a manner where the display of Topcon is oriented towards yourself and the laser emitter and lens is facing opposite direction from yourself. Uncover the lens of the Topcon device. Warning: The laser beam emitted from the Topcon can cause eye damage be careful to not point the laser beam into anybody's eye.
- The battery is loaded on the right side of the Topcon based on the previous orientation placement. To load the battery press grey hatch downwards and the inner socket would open up. Place a fully charged battery in the socket by matching the symbol as shown in the Figure 1. Close the socket by returning the hatch to its original position and press the green power button above battery socket to turn ON the Topcon device. ( Warning: If the hatch and socket is not closed properly the Topcon may not get powered up.)
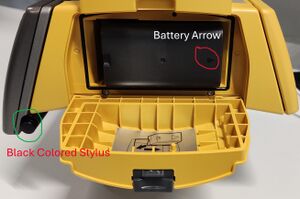
Figure.1: Battery and Stylus location - A Black colored stylus is inserted at the bottom right side of the screen as shown in the Figure 1. Please take it out and use it to operate the screen. (Warning: Do not use your finger to operate the screen as this may damage the screen).
- When the Topcon is turned ON, the display would show a calibration mode for leveling the Topcon horizontal to the ground. In case you have placed the Topcon on the tripod please make sure the tripod is horizontally leveled with the ground. For finer adjustment of the Topcon turn the three rotating valves of the Topcon as required to exactly center the air bubble on the display.The following link is a video guide for leveling the Topcon: https://youtu.be/iAQgFFHBiPo?si=ksqiQ-aiylZ28s8N Once the Topcon is leveled press the back button.
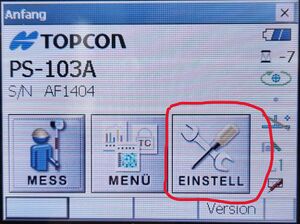
- Now the homepage will be displayed with three main options to choose form. To setup the Topcon for following the prism choose the SETTINGS ( EINSTELL) option as shown in the Figure 2.
- A window would open showing 10 tabs for various configurations. Choose the EDM option that has
 symbol. The EDM option will open a window that would show 6 options as shown in the Figure 3.
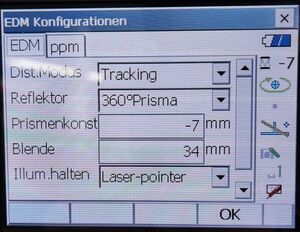
- In the first option of Dist. Modus choose "Tracking".
- In the Reflector option choose "360° Prism".
- In the Prism constant input the "-7 mm" value.
- In the Blend option input the "34 mm" value.
- In the illumination hold ( Illum.halten) choose the option of "Laser pointer".
Upon performing this EDM setup press "OK" in the bottom right corner to save your selections.
- To setup the communication settings go back to the settings mode, and select the Communication Settings option
 below the EDM option. A window displaying three modes will open. Choose the Comm. Modus option as shown in Figure 4.
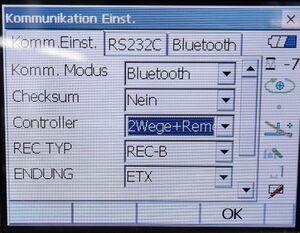
- In Comm.Modus choose the "Bluetooth" option.
- In the Checksum choose "NO".
- In the Controller choose "2Wege+Remote option".
- In the REC TYPE option choose the "REC-B" option.
- In the Ending( Endung) option choose the "ETX" option.
- In the TRACK STATUS option choose the "OFF" option.
- In the ACK MODUS option choose the "ON" option.
In the bottom right side press the "OK" button to the chosen settings. This would setup the Topcon device as a Bluetooth slave for communication with a single Bluetooth master device. To obtain the Bluetooth device ID and Bluetooth Address go to the Bluetooth option beside the Communication settings option and press INFO key on the bottom right. A pop up dialogue box would show the respective details.
- To setup the Topcon for best efficiency to track the prism, we need to setup the motor movement in the Topcon. Go to the settings option and choose the "Motor" option
 . Multiple options will be displayed.
 - Choose the Konfiguration option the top left of the display to setup the basic functions of the motor as shown in Figure 5.
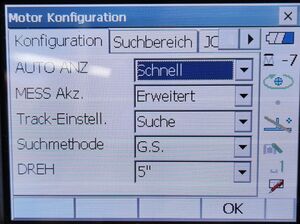
- In the AUTO ANZ option choose the "Fast( Schnell)" option.
- In the MESS Akz. option choose the "Erweitert" option.
- In the Track-Einstell. option choose the "Suche" option.
- In the Suchmethode option choose the "G.S" option.
- In the DREH option choose the 5" option.
- Go to the next tab of "Suchbereich" to select the method of searching the prism.
- In Suchmodus select the "2" option.
- Set the Vertikal to "15°".
- Set the Horizontal to "45°".
- Go to the next tab of "JOG Einstellung" to select the pattern of searching the prism.
- In the Lo option select the "L3" option.
- In the Hi option select the "H4" option.
- In the Shift option select the "2" option.
- Next, go to the next tab of "AT Settings" to select the type of tracking and further features.
- In the advanced tracking option select "ON"
- In the forecast time select the "0.5sec" option
- Give a value of "0" to Wartezeit.
In the bottom right click "OK" button to save the chosen settings.
- Return Back to the Main menu and choose MESS for measuring and tracking the prism.
- After choosing the MESS option in main menu, select the SHV option. A window showing multiple dimension of the prism should open as shown in Figure 6.
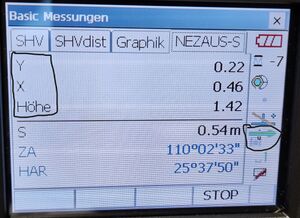
- The bottom of the window has several options to choose from. Please select the TRK An option to start tracking the prism. (Tips: Orient the laser beam emitter located at the front of the Topcon towards the general direction of the prism for faster locking in of the laser beam. Make sure no opaque objects block the path between the Topcon and the Prism)
- Once the laser beam starts tracking the prism click the NEZAUS-S button located at the bottom of the window to send the X,Y and Z data using Bluetooth protocol to your intended device as shown in Figure 6. (Tips: In case the TRK An button or the NEZAUS-S button is not displayed, then please refer to the official datasheet Page: 126 , Section 20.4 , Allocating User Defined Tabs in the link below.)
- Check the green arrow
 on the right hand side of the display. The green arrow represents the data is getting transmitted through Bluetooth protocol towards the intended device. In case the arrow is not indicated then please check the above settings. (Warning: Low battery can cause technical issues for data tracking and communication.)
- For further in depth guide regarding the TopCon PS-103A please refer to the official datasheet: https://sealandsurvey.co.uk/content/PS_E_1.pdf
- Figure. 7 shows a task flowchart to summarize above process.
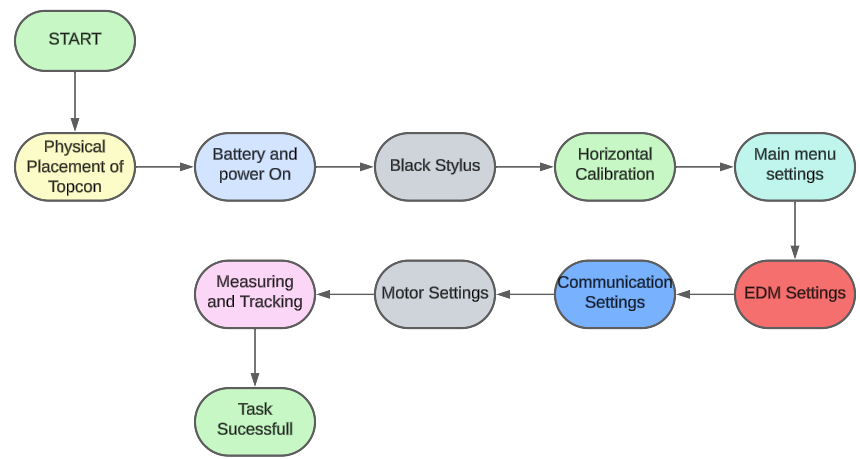
Figure.7: Task flowchart summary
Software
Inbetriebnahme
MagnetField auf dem Feldrechner
MagnetField auf einem PC
Datenvisualisierung mit MATLAB
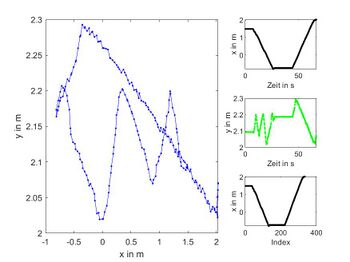
Ein Demo zur Visualisierung der Daten findet sich im Ordner Demo_ZeichneReferenzdaten (vgl. Abb. 2).
Eingangsdatum: 160722.txt
Das Datenformat zeigt Tabelle 1.
Aufruf: ZeichneReferenzdaten.m
Header>> Delimiter(;) FileFormat(Time,Time Stamp,Horizontal Angle,Slope Distance,Vertical Angle,Azimuth,TS Type,Target Point,HR/Ant Ht.,Codes) <<
| Time | Time Stamp | Horizontal Angle | Slope Distance | Vertical Angle | Azimuth | TS Type | Target Point | HR/Ant Ht. | Codes |
|---|---|---|---|---|---|---|---|---|---|
| Zeitstempel | Zeitstempel mit Datum | Horizontaler Winkel in ° | Schrägentfernung in m | Vertikaler Winkel in ° | Punkt Nr. | ||||
| 13:38:53 | 06.10.2012 13:38:53 | 359.5943000000 | 4.670 | -3.3508000000 | SS | 106 | 0.000 |
Für Messungen in der Ebene wird die Position (x;y) vereinfacht berechnet:
x=fSchraegentfernung.*sind(fHorizontalerWinkel); % in m
y=fSchraegentfernung.*cosd(fHorizontalerWinkel); % in m
Jährliche Lizenzverlängerung
Offene Fragen
- Auflistung der notwendigen HW und SW mit Fotos. Was braucht man? Was sind die Voraussetzungen für eine Vermessung?
- Wer ist bei Topcon zuständig für die jährliche Lizenz-Verlängerung (Kontaktdaten)? Welche Infos müssen versendet werden (Mailvorlage)?
- Kann die HS-Lizenz auf mehrere Jahre verlängert werden?
- Lassen sich mit 10 Hz Zeitstempeln messen (0,1 s)? Was ist die höchste Messgeschwindigkeit? Brauchen wir dazu die RS232 Schnittstelle? Wenn ja, wie ist das Protokoll? Gibt es ein SW-Demo?
- Lässt sich der Ablauf vereinfachen? Die Initialisierung braucht man pro Projekt nur einmal zu machen. Wie ist der verkürzte Ablauf danach?
- Tipps für ddie Startausrichtung der Total Station: Was ist dort einzustellen?
- Lizenz auf einem Laptop: Vereinfacht sich die Anleitung für die Bedienung?
- Funktioniert die Vermessung auch ohne RC-5 (Prisma allein)?
- Was bedeutet die Warnung: „Warnung: Kompensator überschritten. Korrekturbildschirm öffen“?
- Weitere Fragen ergeben sich aus dem Dokument Anleitung Topcon Inbetriebnahme.docx.
Tipps:
- Legen Sie bitte Unterartikel an, um die Lesbarkeit des Hauptartikels zu optimieren.
- Heben Sie Wichtiges in Bildern hervor. Ein Beispiel finden Sie hier.
- Fügen Sie für komplexe Einstellungen ein kurzes Video oder Animated GIF hinzu. Bilder sagen mehr als Worte.
SVN Repositorium
SVN Checkout URL: https://svn.hshl.de/svn/TopCon_Referenzsystem/trunk
Weiterführende Artikel
- Inbetriebnahme der RTK DGPS-Empfänger für Außenversuche
- Zubehör RS232 Kabel
Inhalte im WWW
Seiten in der Kategorie „TopCon“
Folgende 3 Seiten sind in dieser Kategorie, von 3 insgesamt.